Step-by-Step Guide: How to Connect an E-Bike Controller Easily
Learn how to connect an e-bike controller with this easy step-by-step guide. Ensure a smooth setup for your electric bike's controller for optimal performance.
Table of Contents
Related Articles:
Whether you’re a seasoned rider or just starting, knowing how to connect e-bike controllers is valuable. After all, you would get over with the bike’s sluggish performance and streamline its operation. But, the question is how to connect an e-bike controller.
This comprehensive guide is all about it. We have broken down the step-by-step process of connecting your e-bike controller so that you can navigate the wiring process with precision.
So, grab your tools, conquer that confusing controller, and get your electric steed ready to be back on the road!

Why you must wire your e-bike controller?
Your e-bike’s controller is the mastermind, which coordinates communication between the motor, battery, and throttle for a seamless ride. However improper wiring can lead to a cascade of issues, including reduced power output, erratic speed control, and even potential safety hazards.
Following a meticulous wiring procedure, outlined in your e-bike’s manual or a reputable source, is paramount for ensuring safe and reliable operation. This proactive approach empowers you to unlock the full potential of your e-bike and experience a smooth, worry-free ride.
Preparing for the wiring process
Identifying your e-bike controller and compatibility
Controller’s-compatibility with your motor and battery is key. E-bike controllers come in two model-specific or universal. While some electric bikes have specific controllers designed for their models, others may require a more universal controller.
To ensure a smooth ride, identify your controller type. Check your e-bike’s specs or consult the manual to see if it needs a specific controller or if you have more flexibility with a universal option.
Tools and materials required
Essential components
For successful e-bike controller wiring, besides a well-equipped workspace, necessary tools are essential. Here’s a breakdown of the necessary tools:
- E-bike controller: This is the brain of your e-bike system, ensuring communication between the motor, battery, and user interface. Ensure compatibility with your specific motor and battery setup.
- Wire strippers: These precisely remove insulation from wire ends for clean and reliable connections.
- Soldering iron and solder: These create permanent electrical connections by melting solder to join wires. Proper technique is crucial for secure and long-lasting connections.
- Heat Shrink Tubing: This insulates and protects electrical connections, preventing shorts and ensuring safety.
- Wire connectors: These simplify wiring and provide secure connections. Bullet connectors or XT60 connectors are popular choices.
- Multimeter: This versatile tool measures voltage, current, and resistance, allowing you to diagnose potential wiring issues during the process.
- E-bike-specific wiring diagram: This acts as your roadmap, clearly illustrating the connection points between the controller and other components on your e-bike model. Refer to it frequently for accurate wiring.
Safety equipment
An important aspect of wiring your e-bike controller is ensuring safety. To avoid any accidental electrical shock, it’s necessary to disconnect the battery from your e-bike before starting the wiring process. Safety should always come first when dealing with electrical components.
Preparing for wiring
Safety Precautions
For your safety, always disconnect the battery from your e-bike before starting the wiring process. This step is crucial to avoid any accidental electrical shock while working on your e-bike controller.
Understanding the wiring diagram
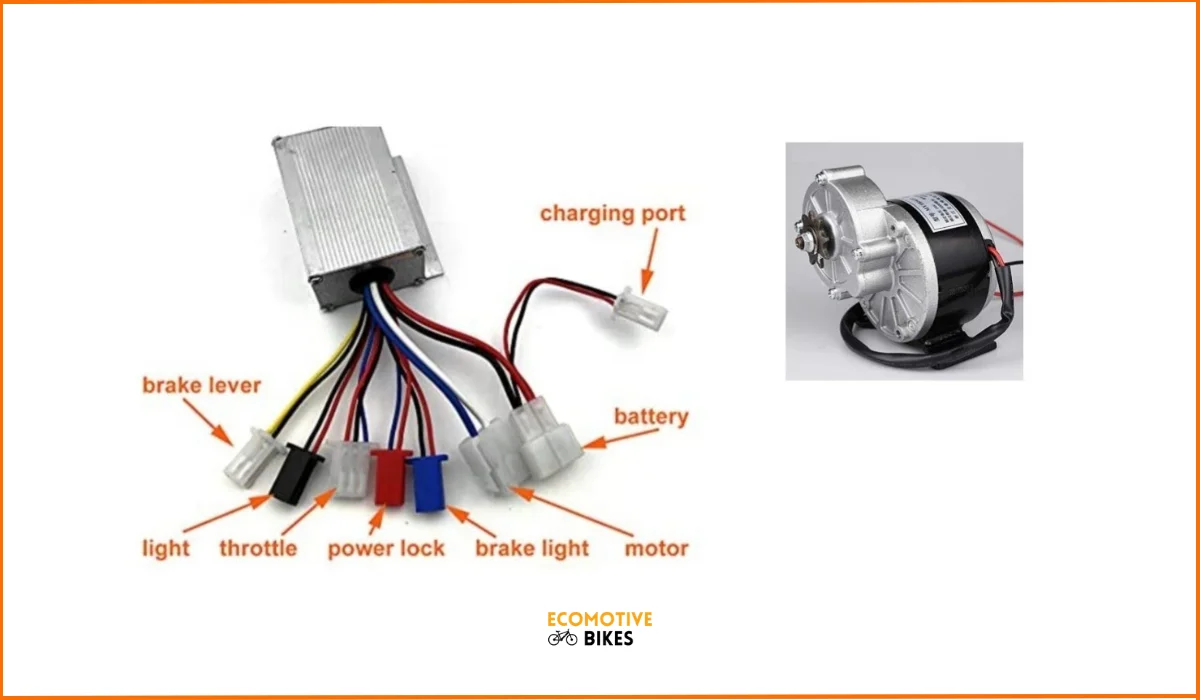
Wiring diagrams are crucial for correctly wiring your e-bike controller. These diagrams provide a roadmap with wire colors and connections specific to your e-bike model. Study the diagram carefully to understand the required connections for components like the battery, motor, throttle, and brake levers.
Step-by-step wiring guide
| Step | Instructions |
|---|---|
| 1. | Connecting the Battery to the Controller |
| 2. | Attaching Motor and Sensor Wires |
| 3. | Wiring the Throttle and Brake Levers |
Here is a video showing how to connect a BLDC controller:
Connecting the battery to the controller
Connect the positive (red) and negative (black) wires from your battery to the e-bike controller using appropriate connectors. Ensure a secure and snug fit to prevent any power loss or safety hazards.
| Connection | Wire Color | Connector Type |
| Battery Positive | Red | XT60 Connector |
| Battery Negative | Black | XT60 Connector |
Connecting motor and sensor wires
Connect the motor wires to the controller following the wiring diagram specifications. If your e-bike motor has Hall sensors, make sure to connect those wires correctly as well. Refer to the diagram for proper wire matching to ensure optimal performance of your electric bike.
With the motor and sensor wires securely attached, your electric bike will be ready to function properly, providing you with smooth and efficient rides. Make sure to double-check all connections and consult your wiring diagram for any additional details to guarantee a successful setup.
| Connection | Wire Color | Connector Type |
| Motor Phase A | Green | Bullet Connector |
| Motor Phase B | Blue | Bullet Connector |
| Motor Phase C | Yellow | Bullet Connector |
Wiring the throttle and brake levers
Attach the throttle and brake levers to the e-bike controller according to the color coding specified in your wiring diagram. This step is crucial in ensuring proper speed control and safety features of your electric bike. Double-check the connections and use the right connectors for a secure fit.
Wiring the throttle and brake levers correctly is imperative for smooth operation and safe riding. Make sure all connections are secure and follow the wiring diagram carefully to avoid any issues during your ride.
Securing connections
Maintaining secure connections within your e-bike’s controller wiring is critical for optimal performance and long-term system health. Improper connections can lead to a variety of problems, including:
- Reduced Power: Loose or faulty connections can impede power flow to the motor, resulting in decreased range and sluggish performance.
- Erratic Speed Control: Inconsistent connections can disrupt communication between the controller and the motor, causing erratic speed control or even complete loss of control.
- Safety Hazards: Loose or exposed wires pose a significant risk of electrical shorts, potentially causing damage to the controller or even fire.
Ensuring stable and secure wiring
Finished the initial wiring connections, and now it’s time to ensure that they are stable and secure. Properly securing the wires is crucial to prevent any potential issues such as reduced power, speed control problems, or safety hazards. Make sure all connections are snug and insulated to guarantee optimal performance.
Here’s how to ensure a safe and reliable connection:
- Double-check tightness: Use appropriate tools to firmly secure all connections. Loose wires can vibrate and become dislodged during operation. Use high-quality wire connectors for a reliable connection.
- Insulate exposed wires: Apply heat shrink tubing to all exposed wire ends and connection points. This prevents wear and tear, short circuits and protects against moisture ingress that could compromise their integrity.
- Verify with a multimeter: Use a multimeter to test for continuity and proper voltage at various points in the circuit. This helps identify any potential issues before powering on the system.
Ensuring all your connections are properly secured is a crucial step in the wiring process. This will help prevent any issues during your e-bike rides and maintain the performance of your electric bike over time. Assume that taking the time to secure your connections now will pay off in the long run with a hassle-free riding experience.
How to do testing and troubleshooting after connecting the controller?
How-to test your e-bike after wiring?
For e-bike enthusiasts, the thrill of a fresh controller installation is undeniable. But before hitting the open road, a crucial step remains thorough testing. This process ensures your e-bike functions smoothly and safely, preventing potential issues down the line.
Here’s how to effectively test your e-bike after controller wiring:
- Reconnect the battery: Double-check for a secure battery connection before proceeding.
- Multimeter magic: This handy tool is your friend! Use it to verify voltage and continuity at key connection points within the circuit. Identify and address any potential wiring issues before powering on the system.
- Functional check: With the system powered on, engage the throttle, brakes, and motor. Observe their response and ensure they function as expected. Smooth and responsive operation across all components indicates a successful wiring job.
This meticulous approach translates into a safe and enjoyable riding experience for every adventure.
Troubleshooting common wiring issues
Even the most meticulous e-bike enthusiast can encounter minor wiring gremlins during controller installation. Fear not! Here’s how to address common wiring issues for a smooth and safe ride:
Taming the troublemakers:
- Connection check: Double-check the tightness of all connections using appropriate tools. Loose wires can vibrate and cause problems during operation.
- Wire woes: Visually inspect the wiring for any signs of damage or wear. Replace damaged wires promptly to maintain system integrity.
- Decoding the diagram: Refer to your specific e-bike’s wiring diagram for proper color-coding verification. Ensure all wires are connected to the correct terminals.
Prevention is key:
- Follow the guide: Always adhere to the recommended wiring procedures outlined in your e-bike’s manual or a reputable guide.
- Test before you trek: Before embarking on your adventure, perform a thorough system check to ensure all components function as expected.
- Seek expert help: If troubleshooting proves challenging, don’t hesitate to consult an e-bike professional or contact your manufacturer for further guidance.
By proactively addressing wiring issues and taking advantage of expert resources if needed, you can ensure your e-bike operates at peak performance, maximizing your safety and enjoyment on every ride.
Final Word: How to connect an e-bike controller?
Conquering your e-bike controller connection is like unlocking a hidden power-up! And this newfound knowledge empowers you to troubleshoot, optimize, and keep your electric steed running like a dream. So, grab your tools, embrace the challenge, and get ready to experience the exhilarating freedom of a perfectly tuned e-bike ride!


