How to Test an E-Bike Controller at Home: A Step-by-Step Guide
Learn how to test an e-bike controller at home with this easy guide. Check for power output, voltage, and sensor functionality to ensure your controller is working properly.
Table of Contents
Related Articles:
Is your e-bike sputtering or acting strange? The culprit might be a faulty controller. Don’t panic, you can diagnose the issue yourself! Testing an e-bike controller at home requires some technical know-how, but with the right tools and guidance, it can be done effectively.
So, grab your multimeter (or an e-bike tester) and walk through this guide on how to test an e-bike controller at home, and get your e-bike back on the road in no time.

E-bike controller sneak peek
Definition and role of the controller
The controller of an electric bike, also known as the brain of the bike, is a crucial electric circuit unit responsible for controlling various components such as the motor’s speed and start/stop functions. It acts as the central hub connecting electronic parts like the throttle, battery, display, motor, and speed sensor. Without the controller, the motor will not function, rendering the e-bike inoperable.
Key functions and protection mechanisms
An e-bike controller plays a vital role in ensuring the safety and efficiency of the electric bike through key functions and protection mechanisms. These include over-current protection, over-voltage protection, low-voltage protection, brake protection, and over-temperature protection. The controller monitors and regulates these aspects to prevent damage to the motor, battery, and other necessary components of the bike.
- Optimized Power Delivery: The controller acts like a power manager, efficiently distributing battery juice to the motor. It adjusts power on the fly based on your input and the terrain, giving you a smooth ride and maximizing efficiency.
- Precise Speed Control: Think of the controller as your e-bike’s cruise control. It regulates motor speed by fine-tuning power delivery based on your input or chosen speed modes, keeping you safely within your desired limits.
- Customizable Pedal Assist: Modern controllers offer a variety of pedal assist modes, letting you adjust motor help to your liking and effort level. This makes riding enjoyable for both experienced cyclists and those looking for a more relaxed journey.
- Enhanced Safety Features: E-bike controllers come with a bunch of safety features to give you peace of mind. These include automatic power cutoff in emergencies, protection against excessive current, and temperature control to prevent overheating. These features not only keep you and your bike safe but also ensure a smooth and secure ride. Here’s a breakdown of some key safety features:
- Over-current protection: Reduces excessive current to the motor and prevents damage.
- Over-voltage protection: Prevents the battery from overcharging.
- Low-voltage protection: Prevents the battery from over-discharging.
- Brake protection: Ensures safety during braking.
- Over-temperature protection: Safeguards against overheating. Understanding these features is essential for keeping your e-bike in top shape.
Key components of e-bike controller
- Microcontrollers (tiny brains): think of these as the e-bike controller’s mini-computers. They analyze signals from various sensors and decide the best way to respond by sending appropriate signals to the motor.
- Power electronics: power manager & AC/DC converter: this key part manages electricity flow to the motor. It regulates battery power for smooth acceleration and efficient energy use. It also converts the battery’s DC (direct current) to AC (alternating current) needed by the motor. By controlling voltage and current, it adjusts motor speed and torque based on your needs.
- Sensors and interfaces: data gatherers & feature enablers: these components collect important data on factors like speed, pedaling cadence, and more. This real-time info is crucial for the microcontroller to fine-tune motor performance. Sensors and interfaces allow features like pedal-assist modes, regenerative braking, and throttle control, making your e-bike ride smoother, more enjoyable, and user-friendly.
Preparing for the test
Tools required for testing the controller
To diagnose your e-bike controller, you’ll need some detective work! Gather these tools:
- Multimeter or e-bike tester to check the controller’s electrical health, i.e., assesses the electrical functionality of the controller.
- The controller: The patient! You’re testing this component for proper function.
- Battery: A fully charged battery of the appropriate voltage and capacity to energize the controller during testing.
Safety precautions and setup
For a risk-free and smooth, safe testing process, you must take the following precautions:
- Power down completely: Disconnect all battery connections from your e-bike before testing the controller.
- Consult the manual: Refer to your e-bike’s manual for specific instructions on controller removal and testing procedures.
- Work in a safe environment: Choose a well-lit workspace and ensure your tools (multimeter or e-bike tester) are functioning properly.
Testing the e-bike controller
There are two main approaches to testing your e-bike controller: using a multimeter or a dedicated e-bike tester. Here’s a breakdown of each method:
Here is a video guide on how to test e-bike controller:
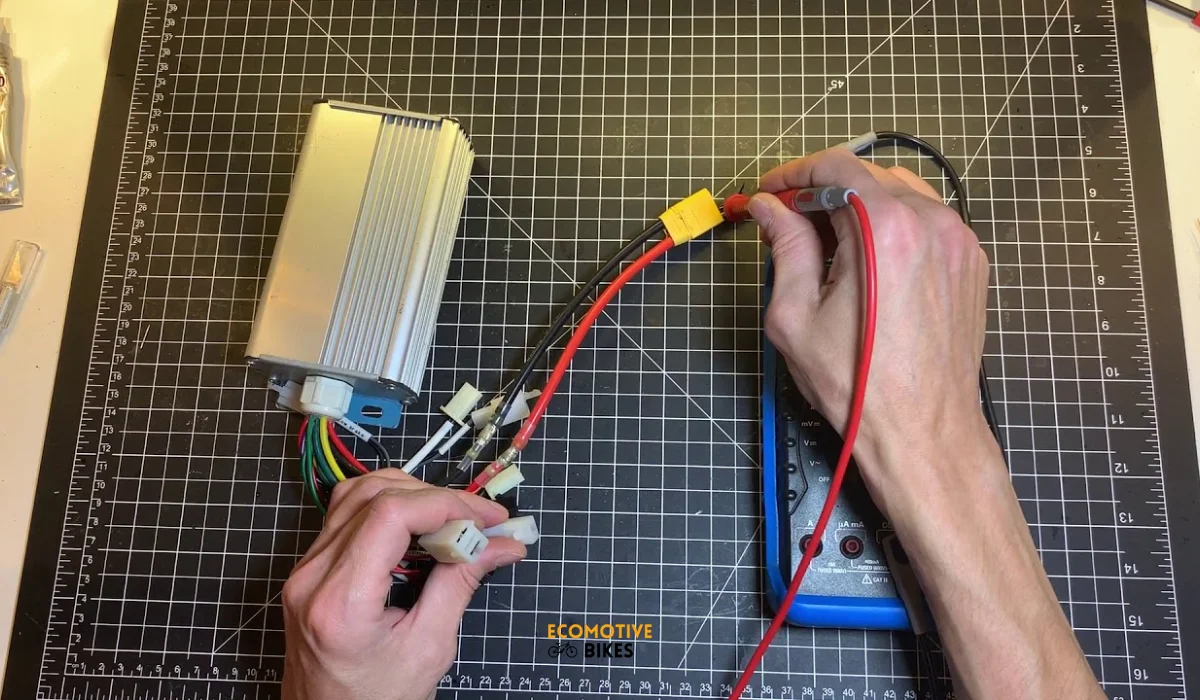
How to test an ebike controller using a multimeter?
The multimeter method is ideal for those comfortable with electrical troubleshooting. It allows for two key tests:
- Resistance test: Measures the electrical resistance across key components within the controller. A reading below 8 kilohms might indicate internal damage.
- Continuity test: Detects short circuits within the controller’s wiring. A “beep” from the multimeter signifies a short circuit.
Ready to diagnose potential issues with your e-bike controller? Here’s a step-by-step guide using a multimeter:
- Controller activation: Establish a test environment that mimics real-world operation by connecting the controller to the battery.
- Multimeter configuration: Tailor the multimeter settings based on the desired test:
- Continuity test: To identify potential short circuits, select the “continuity” mode on your multimeter. Connect the black lead to the negative terminal of the battery.
- Resistance test: To assess the health of controller components, switch the multimeter to the “resistance” mode.
- Systematic probing: Carefully touch the remaining multimeter leading to each individual wire emanating from the controller.
- Continuity test: If a short circuit exists within a particular line, the multimeter will emit a distinct audible beep.
- Resistance test: Note the resistance value displayed on the multimeter for each wire.
Crucial Note: For accurate interpretation of resistance readings, consult your specific e-bike controller’s manual or seek guidance from a qualified e-bike technician. These resources will provide the expected resistance values for each component within the controller.
How to test electric bike controller with an E-Bike Tester?
E-bike testers offer a simpler and more user-friendly solution. They connect directly to your controller and provide visual feedback through indicator lights.
- Functionality analysis: The tester checks overall controller functionality. Flashing lights indicate specific problems with the controller, often with a designated light for controller malfunctions.
Here’s a step-by-step guide to utilizing an e-bike tester for controller diagnostics:
- Controller removal: Following the manufacturer’s instructions, carefully remove the e-bike controller from your bike.
- Throttle verification: Temporarily disconnect and connect the throttle directly to the controller. This confirms the controller receives proper throttle signals.
- Tester connection: Securely connect the e-bike tester to the designated port on the controller.
- Power up: Turn on the e-bike tester according to the manufacturer’s instructions.
- Throttle activation: With the tester powered on, activate the throttle and observe the corresponding lights or indicators on the tester. These signals provide valuable insights into controller functionality.
Understanding the signals: Refer to the e-bike tester’s user manual for a detailed explanation of the indicator lights and their corresponding meanings. This information will help you decipher the tester’s output and determine controller health.
Choosing the Right Method:
- Technical expertise: If you’re comfortable with electronics and interpreting multimeter readings, the multimeter approach offers a more in-depth analysis.
- Simplicity and clarity: If you prioritize ease of use and clear diagnostic results, an e-bike tester is the way to go.
Ultimately, both methods can help identify controller issues. The best choice depends on your comfort level and desired level of detail in the diagnosis.
Troubleshooting common controller problems
E-bikes are fantastic, but even the best components can malfunction. A faulty controller can significantly impact your ride. Here’s how to identify a failing controller and potentially revive it with a reset:
Warning Signs of a Controller on the Fritz
- Motor mischief: Is your trusty motor acting sluggish, unresponsive, or making unusual noises? A controller issue could be the culprit.
- Display dilemma: Are your display or lights flickering, dimming, or refusing to turn on altogether? This could indicate a problem with the controller’s communication with other components.
- Charging challenges: Is your battery taking longer to charge or not holding a charge at all? While the battery itself could be the issue, a faulty controller might also be to blame.
- Overheating anxiety: Is your controller getting excessively hot during use? This is a red flag and should not be ignored.
If you experience any of these symptoms, it’s wise to test your controller using a multimeter or e-bike tester (see previous section for details).
How do I reset my e-bike controller?
While specific reset procedures may differ slightly between manufacturers, here’s a general approach for most e-bikes:
- Power down completely: Ensure your e-bike is entirely off and disconnected from the power source. This typically involves turning off the display and removing the battery.
- Discharge period: Allow the controller to fully discharge for at least 10 seconds. This ensures any residual electrical charge dissipates.
- Reconnect and power up: Reinstall the battery securely and power on your e-bike as usual.
This basic reset can often resolve minor glitches or communication issues within the controller. Here we have a detailed guide for resetting e-bike controller.
Note: If the reset doesn’t rectify the problem, consult your e-bike’s user manual for manufacturer-specific reset instructions. Additionally, a qualified e-bike mechanic can provide further diagnosis and potential repair solutions.
FAQs about e-bike controller
What causes an e-bike controller failure?
Several factors can contribute to e-bike controller failure. Internal power supply damage, exposure to harsh weather, and loose wiring connections are all common culprits. If your controller malfunctions or acts inconsistently, a visual inspection can reveal signs of these issues like burn marks, rust, or loose wires.
Can e-bike controllers overheat?
Yes, e-bike controllers can overheat, especially under heavy use or on hot days. While a brief period of overheating isn’t necessarily dangerous, long-term overheating can damage the controller and shorten its lifespan. If your controller feels very hot, ease off on strenuous riding and let it cool down.
Why does my e-bike keep on cutting out?
There’s no single answer, as many things can cause an e-bike to cut out. Common culprits include:
Low battery: Check your charge level! A depleted battery can cause power cuts.
Loose connections: Wiggly wires can disrupt the flow of electricity.
Failing battery: Even a charged battery can be faulty.
Motor issues: Worn motors might struggle to maintain power.
If a quick check doesn’t reveal the issue, consult your e-bike manual or a mechanic.
How long does a typical e-bike controller last?
An e-bike controller’s lifespan can vary, but on average, you can expect 3-4 years with proper care.
Signs of wear include motor issues, display malfunctions, or overheating. While a multimeter can help diagnose issues, consulting a qualified e-bike mechanic is recommended for a definitive answer.
How can I tell if my e-bike controller is bad?
Your e-bike controller might be acting up if you experience:
Motor malfunctions: This could be sluggishness, weird noises, or complete motor failure.
Display or light issues: Flickering, dimming, or total blackout could indicate communication problems.
Battery charging troubles: Slow or failed charging suggests a potential controller issue (but the battery could also be the culprit).
Excessive controller heat: An overheating controller is a red flag and shouldn’t be ignored.
Final Word: How to test an e-bike controller at home?
Conquering e-bike woes can be empowering! And with the knowledge of testing your controller at home, you’ve become a diagnostician extraordinaire. Whether you wield the precision of a multimeter or leverage the user-friendly interface of an e-bike tester, following the proper procedures you can tackle controller troubles with confidence.
Remember, for minor glitches, a simple reset might do the trick. But if a reset doesn’t work, or it has a more complex issue arises; seeking professional help is always an option. Regardless, with this proactive approach, you’re now equipped to get your e-bike back on the road in no time, maximizing your enjoyment of this thrilling mode of transportation.


